QuadCamera App and Jelly Lenses for the iPhone

Whether or not you think the iPhone 4 can be considered a serious camera, it is, after all, a camera and it captures images in a similar manner to all the Point & Shoot cameras and all the DSLR’s.

Where the iPhone4 really shines is that it’s fun, adaptable, portable and unobtrusive. Going out for an evening of fun and you want to take photos of your friends? You have your iPhone. You’re at a birthday party for your child’s friend and forgot your camera? Take photos with your iPhone. If you have an iPhone you probably always have it with you. Because you do, you always have a camera with you and not only does it take pictures but there are hundreds of apps as discussed in the last post and lots of gadgets that you can buy. For this article, I’m going to concentrate on one app and three add-on lenses.

The app is QuadCamera – MultiShot. It sells for $1.99. The fourth release in the series of Takayui Fukatsu’s ToyCamera allows you to take continuous shooting with high quality effects. In 2009 this app was the winner of Best App Ever Award and the 2009 Best Photography App.

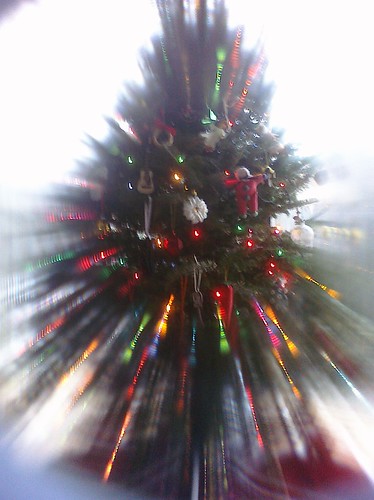
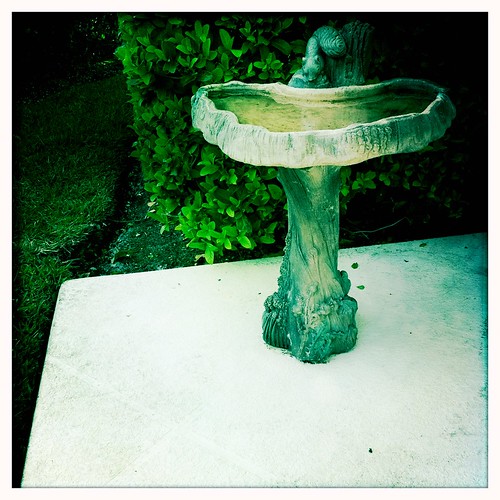
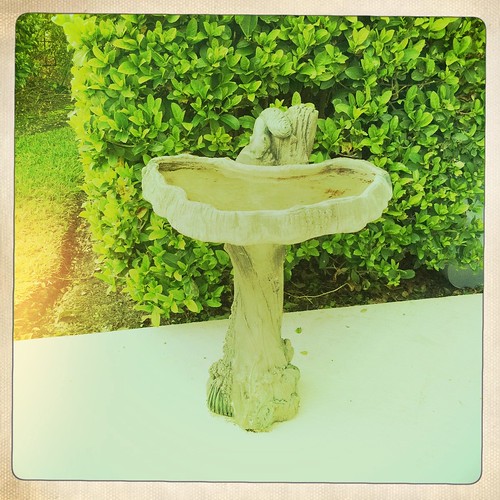
QuadCamera will take either 4 or 6 photos at one press of the button. The 4 photo option appears to fit better with the iPhone than the 6 photo option. This photo of the birdbath shows the result of taking a photo with the QuadCamera app.

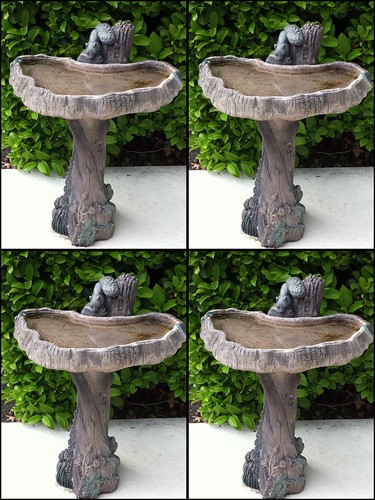
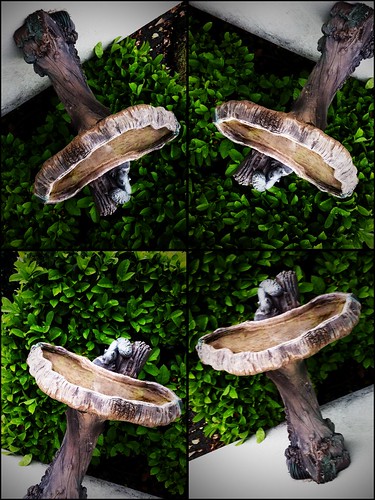
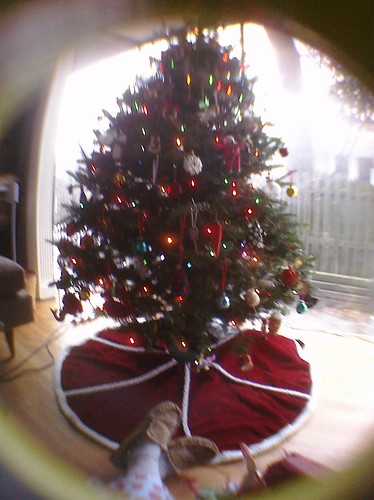
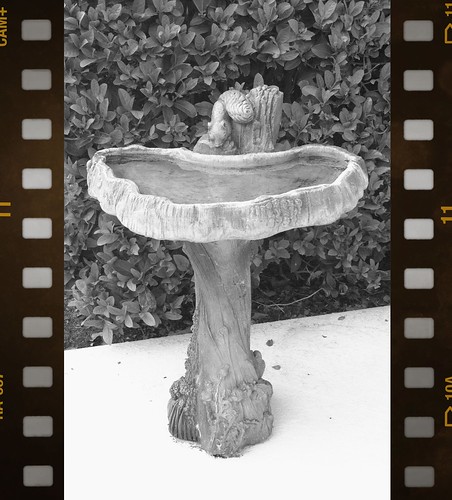
You can adjust the speed at which QuadCamera captures the images from 0.20 seconds to 3.0 seconds. The image above was taken with a 0.50 second time between captures. For the next image I set the interval timing to 2.0 seconds so I had time to turn the camera (iPhone) and re-compose the image before the capture.

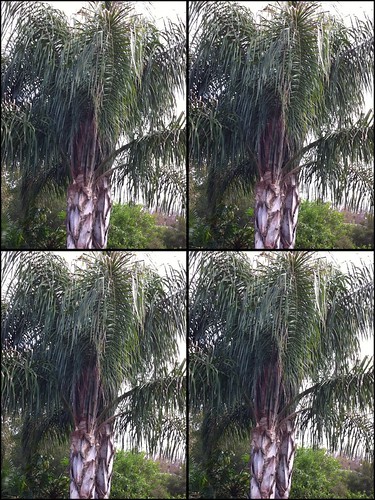
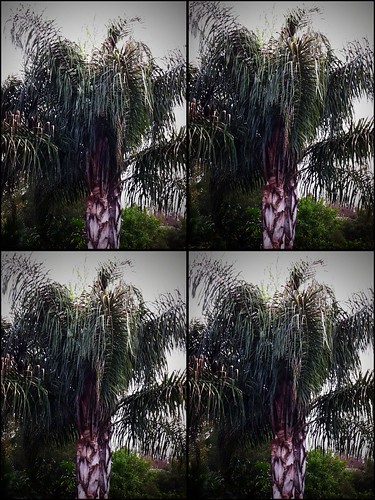
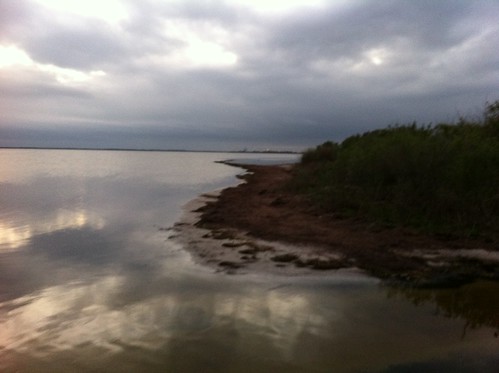
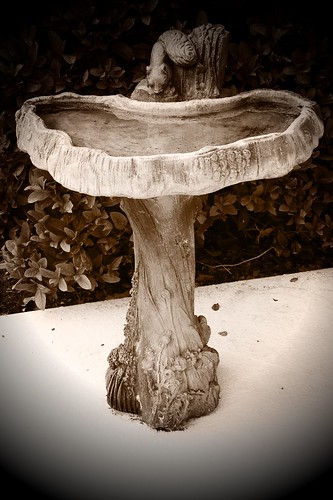
You can also select from 6 preset color/exposure settings. For everyone that’s really tired of the winter weather, I included the next two images to demonstrate two different color/exposure settings and to feature some of the palm trees in my back yard.

QuadCamera is a fun app but not overly practical. However, I think it’s possible to capture an interesting series of images, especially, if the subject is moving. If you don’t already have QuadCamera I recommend adding it to your collection of apps on your iPhone.

For the gadgets I ordered three add-on or “stick-on” lenses from PhotoJoJo Store. If you’re not familiar with this interesting site, I recommend you visit PhotoJoJo Store and check out the products they have available. Most of the products are either for having fun with your camera or tongue-in-cheek items. For example, when I ordered the three lenses I also ordered a coffee cup that is a very accurate copy of one of the lenses for my DSLR. They have both a Canon and a Nikon lens replica coffee cup.

The three stick-on lenses are called Jelly Lens and come in three different models – starburst, wide angle and 6 image mirage. The diameter of the lens is about the same as a penny and has a key chain style lanyard with a clasp for attaching to your phone. The side of the lens that attaches to your phone has an O-ring of a soft plastic (hence jelly lens) that sticks when pressed against the phone over the camera lens. Each lens costs $5 and is shipped in an easy open package as seen in the photos below.

I was excited to try out these lenses when they arrived. I thought the packaging photos for the 6 image mirage and the starburst were quite interesting and the wide angle lens can be used as a fish eye lens as well. Unfortunately, at least for me, the O-ring or adhesive wouldn’t remain stuck to my iPhone. I tried all three lenses with the same result. I also tried gently cleaning the O-ring with soapy water as directed on the back of the packaging but it still wouldn’t stay on the iPhone. I don’t know if all three lenses were defective, which I doubt, or if the glass casing on the iPhone 4 is so highly polished that the O-ring can’t form a strong enough bond to the casing.

So, try again. My wife’s iPhone is a 3G that’s about 2 years old that is made with a different material for the back case. I borrowed her phone and tried sticking the lenses on it. Unfortunately, I had the same result. All this was disappointing because I really wanted the lenses to work so I take a number of photos with them. However, I was able to find some images on Flickr and have included them below.

multiple Cuca

Here is the reason I was really wanted to use the lens. This is a photo of a cat using the 6 image mirage lens.

"starburst" Jelly Lens

This image was captured using the starburst lens.

"wide angle/fisheye" Jelly Lens

And this image was captured using the wide angle/fish eye lens.

As you can see, the Jelly Lenses have the potential for a few hours of fun using the special effects they provide. I think they’re worth the $15 for the set and maybe you’ll have better luck with them than I did.

Photo Credits: All photos except those with the Jelly Lenses by Steve Russell
multiple Cuca by violinha by violinha on Flickr Creative Commons
Starburst Jelly Lens and Wide Angle/Fisheye Jelly Lens by The Shifted Librarian on Flickr Commons

Comments { 1 }

Organizing your iPhone Photos with Free Apps

Photos taken with an iPhone typically end up in one of three places – stored on the iPhone until they’re deleted or the phone is replaced, uploaded to and kept on an image hosting website like Flickr or stored on a social networking site like Facebook. Each has its own advantages.

Keeping the photos on the iPhone is another way in which the iPhone is a multi-tasker. People used to carry snapshots in their wallet or purse so they could show to family and friends pictures of their boyfriend/girlfriend, children/grandchildren or other people and places that were important to them. Carrying the actual printed photos quickly became a bulk problem. With the iPhone people can now carry hundreds of pictures limited only by the amount of memory available on the phone and can really bore their friends and family. It can even be used as a replacement for Uncle Harry’s 35mm slide show of his latest vacation. Kidding aside, the iPhone is a very convenient way to carry the images that are important to us.

If you want to upload the photos to your computer or to a website like Flickr or Facebook you will need an app for your iPhone. For this article I spent a few hours online researching bulletin boards, review sites and blogs trying to find the best apps for each of the upload options. The results were kind of scary because of all the difficulty people seemed to be having with various apps. So, I started testing them myself.

Uploading to your computer—windows only

For all the Apple devotees out there, I’ve been using a PC since the early 1980s so my comments will refer to a Windows system. It seemed that at one point people were experiencing a lot of difficulty trying to upload saved photos from their iPhone to their Windows computer. However, there is a very simple way to do this that if you follow these steps it will save you a lot of frustration. When you connect your iPhone to the computer, even if iTunes automatically opens, a Windows system dialog box pops up asking you what you want to do with the device you just connected to the computer. On my computer the first choice is to treat it as a camera. Highlight that choice, click OK and follow the steps indicated. It’s fast and easy.

Once the images are on your computer it’s like any other photo from any other source. You can upload it to Flickr, Facebook or any other site. You can also manipulate the photo in the same manner as all your other photos.

Uploading to Flickr

There was a lot of chatter about what app to use to upload photos to Flickr including a number of negative comments regarding the Flickr app. I have to assume that either all the bugs have been corrected or a lot of the negative comments were from those special people that just like to post complaints online.

Using the Flickr app for the iPhone is almost as easy as uploading photos from your computer using Flickr. All you have to do is follow these easy steps once you’ve installed the Flickr app on your iPhone:

1. Log on to your Flickr account through your iPhone.
2. Touch the camera icon in the upper right corner of the screen.
3. Touch the ‘Upload from Library” bar.
4. Touch the photo(s) you want to upload.
5. Touch the “Next” bar in the upper right corner.
6. Add a title, a description, add the photo to a set or add a tag to the photo. You can also set the resolution – either full resolution or medium format.
7. Touch the green “Upload” bar on the bottom right corner of the screen.
8. You’re finished. The photo has been uploaded.

It really is that simple and it’s quick. Best of all, the app is free.

Uploading to Facebook

Facebook is even easier than Flickr. Make sure you have the latest Facebook app on your iPhone.

1. Log on to your Facebook account.
2. Touch the “Photos” icon
3. Touch the Album you want to upload the photo to (I have one called Mobile Uploads that was automatically created the first time uploaded a photo)
4. Touch the camera icon in the upper right corner of the screen.
5. Touch the “Choose From Library” bar at the bottom of the screen.
6. Touch the album you want to upload the photo from (When you take a photo with your iPhone it automatically goes into a folder named “Camera Roll”).
7. Touch the photo(s) you want to upload
8. Press the “Upload” bar in the lower right corner and the photo uploads to your Facebook account.

That’s all there is to it. Like the Flickr app, the Facebook app is free.

One of the comments/complaints I read about frequently while searching various bulletin boards and blogs was that the person making the post couldn’t upload photos to Flickr from the camera roll. They could only upload immediately upon taking the shot. I haven’t had that problem so as I mentioned before, either the problem has been resolved or it was an error on the part of the user.

Here are some examples of iPhone photos I uploaded to my Flickr account:

This photo was taken by my daughter during a recent snow storm in Ft. Worth, TX using her iPhone. She sent it to my iPhone by text message and I uploaded it to Flickr from my iPhone. I then “grabbed” it from Flickr for this article.

I took this photo with my iPhone on Merritt Island, FL looking across to the launch pads at the Kennedy Space Center. I was taking photos with my DSLR on a tripod and captured this one by holding my iPhone above my DSLR. Following the steps above, I uploaded it to my Flickr account.

Both of these photos illustrate some of the limitations of the iPhone. While the iPhone captured the image of the snow storm and allowed my daughter to send me proof of the weather they were experiencing, the camera function of the phone, as do most if not all cameras, exposed for 18% gray causing the snow to look dingy. With a DSLR the photographer can compensate for that and make the snow appear white in the image.

The second image was also outside the ability of the iPhone to render an acceptable image. The image below was taken with my DSLR at approximately the same time as I took the same image with my iPhone. However, with my DSLR I captured three bracketed exposures and converted them to an HDR image.

Sunrise over Cape Canaveral 1

If you know the limitations of the iPhone and you use the iPhone in situations where it’s designed to be used, you can still capture good images and easily upload them to your Flickr or Facebook account.

In the next article, I’ll talk about some apps for editing the photos you’ve taken with your iPhone.

Photo Credits: Snowy Tree by Amy Raines
All other photos by Steve Russell

Comments { 3 }

Photo Editing Apps for the iPhone

With the first cellphones that had cameras, you could take a photo and that was it. There was no way to manipulate the image without figuring out how to get it on your computer and using something like Photoshop to modify the image. Today, there are hundreds of apps you can download to your iPhone that can be used to manipulate your images. In fact, I could probably make a career out of reviewing and writing about camera/photography related apps for the iPhone alone if anyone was interested. Since this is one of a series of 4 or 5 articles and not a career, I selected three apps for this article – Hipstamatic, Camera+ and Adobe Photoshop Express. My “scientific” method for selecting these three apps was simple. The first two are hugely popular and the Photoshop (PS) Express is because I use Photoshop all the time and wanted to see how the less than 64 calorie lite version worked. I also selected those three because each one worked differently.

Hipstamatic

With Hipstamatic, you select the result you want to achieve by selecting the film, lens and flash before you take the shot. Once you take the shot, you’re done, at least as far as using Hipstamatic. That’s probably part of the appeal. It works like cameras did twenty, thirty years ago or longer. Thirty years ago if I wanted to produce a grainy black & white image, I put Tri-X (400 ASA) or T-Max 400 film in my camera and started shooting. If I wanted less grain I would shoot with Plus-X (125 ASA) or T-Max 100. Once the film was in the camera and you captured the image, even though you could manipulate the image in the darkroom, you couldn’t make Tri-X look like Plus-X regardless of what you did.

The app costs $1.99 and comes with three film type effects, three lens type effects and three flash type effects. You can also purchase any of an additional five packages for $0.99 each containing various film, flash and lens combinations. The basic package gives you 27 possible combinations of film, lens and flash, and if you buy all of the additional five packages you would have a total of 441 possible combinations. However, my guess is that most people that use Hipstamatic have a few favorite combinations that they use almost all the time to achieve the overall effects they desire.

To demonstrate how these apps work, I decided to use this bird bath in my back yard as a subject. This first image was taken with my iPhone without any manipulation to provide a base line for comparison.

This image was captured using the Blanko film, standard flash and John S lens combination in Hipstamatic.

This image is the result of the Ina’s 69 film, Jimmy S lens and Dreampop flash combination.

This is the last image taken with Hipstamatic and combines Kodot film, Kaimal Mark II lens and Cherry Shine flash.

As I indicated above, there are 27 different combinations in the basic package. These combinations were selected randomly and I haven’t tried all 27 to determine the combinations I prefer, but these four images at least provide an idea of what kind of effects the app provides. You do have to select a film and a lens, but you have a choice as to whether or not you use the flash when you take the photo.

On the plus side, I think it’s a great app for the 15 to 30 or 15 to 40 age groups. I think it’s more of a “fun” app than an image manipulation app, but in looking at images posted on Flickr, I found a number of creative applications that produced some interesting arty kind of images.

On the negative side, I found it difficult to compose an image in the small square “viewfinder” the app provides. Frequently the key subject was centered in the “viewfinder” and then off to one side or the other in the finished image. It also seems slow to change the selections, take a photo and for the photo to “develop” but that could be the user as much as the app.

Camera+

At the risk of upsetting a lot of Hipsamatic fans, I believe that Camera+ is superior to Hipstamatic for one very important reason. With Hipstamatic and similarly designed apps, you select the effects and hope the result is what you’re trying to achieve. Camera+, on the other hand, is an app that allows you to manipulate the image after you’ve captured it. In other words, it’s a post processing app that is available for a price of $1.99.

The app effects are laid out in a logical workflow order. You can either capture the image once you have opened the app or you can “grab” an image from your camera roll and manipulate it in Camera+. Once you’ve selected the image there are five categories of changes you can make:

1. Scenes – this is presented as a lighting difference. It appears that it is making small changes to EV and White Balance depending on the scene type you select – night, portrait, beach, sunset, etc.
2. Adjust – this rotates the image 90 degrees left or right and/or flips the image vertically or horizontally. The horizontal flip is interesting because it mimics the result of reversing a negative in an enlarger so that left becomes right and right becomes left.
3. Crop – this category allows you to crop freeform the way you want the image or you can use a number of pre-set crops that create various shapes and image sizes.
4. FX Effect – Modifies the color and tone of the image. There are 27 choices plus an additional 9 that can be purchased for $0.99.
5. Borders – Like Crop, this one is self-explanatory. There are 18 different borders from which you can select.

The following three images were taken with the Camera+ app and manipulated in the app to produce the images.

Photoshop Express

With Photoshop Express you can:

1. Crop, straighten, rotate or flip the image
2. Change the exposure, saturation, tint, contrast or convert to black & white.
3. Sharpen, use soft focus or sketch
4. Effects which are mostly color and tone changes as well as add borders to the image.

As you might expect, this isn’t Photoshop CS5 or Lightroom 3, but for a free app, it does a pretty good job. The first image is the same tree in the snow that I used in the last article. As I pointed out, the sensor in the iPhone exposes for 18% gray and causes the snow to look gray. The second image I changed the exposure to render the snow as white and sharpened the image somewhat. I made no other corrections.

For this image, I cropped it, changed the exposure, converted it to black & white, softened the focus, added a border and showed it to the subject, all in less than a minute from the time I took the photo until I was finished with the adjustments. The Photoshop Express uses the same common finger-swiping motions to set the adjustments that the iPhone employs for other applications.

After working with these three apps for a few days, I like the Photoshop Express the best and the Camera+ second. One of the reasons I prefer Photoshop Express is because I use Photoshop CS5 and am familiar with its features and terminology. I also feel that Photoshop Express and Camera+ give the photographer more freedom to manipulate an image than does Hipstamatic. However, as the most popular image manipulation app available, there are a lot of people out there that prefer Hipstamatic and would disagree with me. It’s up to you to select the one that fits your requirements the best. They are all excellent apps that are inexpensive and easy to use.

Photo Credits: All Photos by Steve Russell

Comments { 3 }

Putting the iPhone Camera to the Test – Compared to a DSLR

Recently I attended an event that I didn’t expect to be anything more than something I had to go to because it was expected. It turned out to be much more fun than anticipated and I started wishing I had brought my camera with me. Since I didn’t I took out my iPhone and started shooting away. To my surprise, some of the images were quite good.

This experience got me to thinking about the iPhone as a camera in ways I hadn’t thought about it before. I know people that believe that the iPhone is a great camera and they wouldn’t have any other while other people I know scoff at the idea of the iPhone being a “serious” camera.

I have a DSLR that I use for most photo opportunities so I decided to compare the two for myself. As luck would have it, at about the same time I was given this opportunity to write a series of articles generally talking about putting the iPhone as a camera to the test. This is part one where I compare and contrast the two types of cameras to emphasize the strengths and limitations of the iPhone camera.

In some ways, comparing the camera in the iPhone 4 to a high end DSLR is like comparing a hamburger from the local pub to an 18 oz. porterhouse from Peter Luger’s Steak House in New York. Yet, the hamburger is pretty darned good and most people eat hamburgers more often than they do expensive prime grade steaks. A comparison of this nature is unfair to the iPhone. It’s not designed to compete with a DSLR and to expect it to compete at that level is unrealistic. However, it is a camera, among other things, and we compare cameras of different levels all the time.

Limitations of the iPhone

Snowy Egret

You can’t take a photo like this one with an iPhone for a number of reasons, the main two are the focal length of the lens and the sensor size. This image was captured using a Canon 7D and a 300mm telephoto lens. The iPhone sensor is miniscule compared to the 7D’s sensor and the lens on the iPhone is equivalent to a 28mm wide angle lens on a 35mm camera or possibly a 45mm on the 7D. Of course, most people wouldn’t try to take a photo like this with an iPhone.

The image was also cropped so that the bird was the dominant part of the image. Because of the small sensor size of the iPhone, cropping an iPhone image to show the bird as large as in this photo would result in so much noise in the image that it would be rendered unusable.

Now that you have an idea what I’m talking about when I mention limitations of the iPhone when compared to a DSLR, I’ll list all the ones I can think of.

1. No interchangeable lenses
2. The user can’t control/adjust the shutter speed
3. The user can’t control/adjust the aperture setting
4. Small sensor limits the ability to produce quality prints larger than 8X10
5. Image quality degrades in low-light situations
6. Only 5 megapixels
7. No on-camera white balance control

Because the lens is a fixed focal length lens, the only way you can “frame” the photograph before taking it is to move closer to or farther away from the subject. To be fair, the iPhone4 has a 5x digital zoom slider. However, if you use a digital zoom you will lose image quality. You would probably achieve better results by not using the digital zoom when taking the photo and cropping the image in any number of image processing software products like Photoshop, Photoshop Elements, iPhoto, etc.

Like many smart phones, the lens has a fixed aperture of f/2.8 which fixes the depth of field. However, the iPhone automatically adjusts the shutter speed and ISO to get the best exposure. Tests have indicated that the ISO can range from 80 to as high as 1000 and the shutter speed can vary from a low of 1/15 of a second to a high of 1/1000 of a second.

Most point and shoot cameras have the same limitations except a majority of them now have more than 5 megapixels. Granted image quality (IQ to us photography geeks) isn’t solely dependent on the number of megapixels and the size of the megapixels is important, but a higher number of megapixels is one indication of potential IQ of a camera, so don’t expect the iPhone to perform as well as the higher end P&S cameras.

Advantages of the iPhone

Portability is one of the iPhones greatest advantages. I always have my iPhone with me. It easily fits in my pocket and if I want to take a photo it’s extremely easy to use.

The iPhone is a consummate multi-tasker. Ten years ago you would see people that carried a pager, a PDA, a cell phone and if they wanted to take photos they also carried a camera of some type. The iPhone, and other smart phones, take the place of all those gadgets and they do a much better job.

The iPhone is much less intrusive than a DSLR. Imagine going out to dinner with a group of friends and pulling out a DSLR with an external flash attached. It’s overkill for the kind of photos you’ll be taking and you’ll more than likely attract attention from everyone else in the restaurant. If you’re taking photos with your iPhone, most people won’t even notice. Cell/smart phone cameras have become so ubiquitous that people tend to ignore them which can facilitate great candid shot opportunities.

You can take a photo with the iPhone and immediately email it to someone. Try that with a DSLR or P&S cameras. I took these two photos at a whisky tasting I was attending so I could send them to a friend, mostly to make him envious. I sent them as a text and received confirmation via return text message that they had the desired effect within minutes after taking the photos.

010

009

When you’re not trying to exceed it’s capabilities it actually takes good, clear photos. Frankly, 5 megapixels isn’t something to scoff at especially given the physical size of the iPhone’s sensor. Here are a number of photos taken with iPhones where you can easily see that there are users out there taking very good images with the iPhone.

Boats at Spadina Quay

iPhone 4 portrait of Emma

[iPhone] Don't fall in..

[iPhone] Sunset over Glen Garry, New Year's Day 2010

Day43

Howth sunrise

I believe that these images show that a lot of people are producing very good quality images using their iPhone. What is also interesting is how the various apps and available gadgets are being used to create various effects with the iPhone. I’ll talk about those in the next article.

Photo credits:
Snowy Egret by Steve_Russell_Photography on Flickr
Glass of Scotch by Steve Russell on Flickr
Five Glasses of Scotch by Steve Russell on Flickr
Boats at Spadina Quay by fortinbras on Flickr Commons
Emma by JaredEarle on Flickr Commons
Don’t fall in… by slynkycat on Flickr Commons
Sunset over Glen Garry by slynkycat on Flickr Commons
Day 43 byyuki on Flickr Commons
Howth Sunrise by Damo B on Flickr Commons

Comments { 4 }

Hot Valentine’s date? There’s an app for that

It’s February, and love is in the air. Or is that just an unusually strong 3G signal?

Could be both if you use your smartphone to prepare for and pull off an epic Valentine’s Day date. Here are some apps to get you going:

Date Check

So I Dated an Axe Murder

Look before you leap with Date Check ($7-$20 per check, iPhone and Android), from background check giant Intelius. Enter whatever ID information you have for your potential sweetie, and the app sifts through a massive public records database to uncover criminal background, financial details and whether he’s really still living in his parents’ garage. Or married.

A Greasy Spoon Ain’t Sexy

Urbanspoon

A romantic dinner is pretty much the foundation for any serious Valentine’s Day canoodling. Haven’t picked the place yet? Then better get cracking with Open Table (free, available for iPhone, Android and most other smartphone platforms), which shows restaurant availability and customer reviews and lets you make instant reservations. Competing reservation service Urbanspoon (free, iPhone, Android, iPad and Blackberry) has restaurants that Open Table skips, more rating features and a slot machine widget for the chronically indecisive. The app also includes a geolocation feature that shows restaurants near you, in case your plans crash and you need to go into hunt-and-gather mode.

Hello Vino

I’ll Have Bottle of Your…

You expect your date to drink what with the seared scallops and saffron risotto?!? Let your phone help you make an informed wine choice with Hello Vino (free, iPhone and Android), which recommends compatible wines according to food pairings and personal tastes.

Smooth Like Butter

Psst! You should say something nice about the way your date looks. Several times. For the terminally tongue-tied, Wheel of Compliments,  ($1.05, Android) provides admiring comments at the flick of a finger. Love Poems (free, Android) adds a little iambic pentameter to the sweet talk. Or deliver the verbal strokes the cute and sweet way — realistically inscribed on the image of a candy heart — with Candy Hearts ($1, iPhone.)

clubZone

You can Dance Right?

Dinner went well and you’re ready to crank up the good vibes. Wertago (free, iPhone and Android) and clubZone (free, iPhone) are location-aware services that tell you about nearby clubs and dance spots, with reviews and social hooks to find friends in the area (in case you need a wingman).

Kissing Test

Time to Move In

Time to test the chemistry? Have your best moves ready by practicing with Kiss Me (free, Android) or Kissing Test (free, iPhone). Both apps use your phone’s touch screen to evaluate your kissing technique and suggest improvements. Just have a tissue or two handy to wipe the screen afterward.

Ejector Seat!

Fake Calls

You, of course, are witty, charming and irresistible. But it takes two to make magic. Buy yourself a little disaster insurance with Fake Calls ($1, iPhone). The app will deliver a convincing fake phone call at the time you specify. If the date’s going swell, make a show of not answering. If it’s veering into chew-your-leg-off territory, take the call and deliver the “No, first you have to seal off the cobalt chamber, then reboot the reactor” monologue you’ve practiced and dash off to deal with the faux emergency.

OpenTable

Wheel Of Compliments

Love Poems

Candy Hearts

Wertago

Comments { 3 }

How we use our phones

Cell Phone Usage
Via: Online IT Degree

Comments { 2 }

Dropped your phone in the toilet?

Everyday thousands of phones get wet, whether you dropped it in the toilet, spilled coffee on it, got pushed into the pool or put it through the washing machine, now what do you do? Calm down, take a deep breath because Geekaphone has a few steps that you can follow to try to save your phone (no promises).

  • Get it out of the water, asap! The longer your phone is in water, the more likely it is to have permanent damage.
  • Get the battery out! Quickly as possible pull of the back cover and get that battery out. When the phone is on and current is going through, it is more sensitive to damage and possible short circuiting.
    • Now that your phone is off, leave it off. Your friends can wait until you get on the computer to know that you dropped your phone in to the toilet.
  • Remove your sim card if you have one, located near the battery
    • Sim cards survive pretty well, so dry it of with a cloth and then put it aside.
  • Dry off as much water as possible
    • Open the phone up as much as you can and then dry up as much water you can, this means inside the phone where the battery was,
    • DO NOT use a hair dryer, it will likely push water further into your phone, and the heat can damage parts in the phone
  •  

  • Put your phone in a bowel of uncooked rice or other coarse substance that absorbs water to take away the moisture
    • Desiccant, the silica gel packs usually found in purses and pockets, is the best option if you can find it
    • Put your cell in a bag with the rice or desiccant and leave over night
      • Rotate the phone every few hours
  • Leave your phone alone for 12 hours
  • If there is still moisture present after this, then set your phone on an absorbent cloth like shamwow for another 6-8 hours turning every few hours
  • If your phone appears dry after at least 12 hours then put the battery in the phone and turn it on

Some other things to keep in mind:

  • Never try to heat your phone in order to dry it
  • Some phones handle water better than other
    • iPhone
    • Droid
  • How to disassemble a blackberry
  • Alternatively you might want to try using distilled water to save your phone (especially in salt water)

If all else false well at least you have a funny story like comedian Kristi McHugh

Comments Off on Dropped your phone in the toilet?

How Important Have Apps Become?

How Important Have Apps Become?
Via: Flowtown

Comments Off on How Important Have Apps Become?

A Look At the Windows Phone 7

Web TV

Comments Off on A Look At the Windows Phone 7